How to Enable or Disable Windows 8 Lock Screen
Inspired from Windows Phone 7 Metro UI look and feel, Microsoft included the same lock screen in Windows 8 optimized for both PC and tablet ...- Article authored by Kunal Chowdhury on .
Inspired from Windows Phone 7 Metro UI look and feel, Microsoft included the same lock screen in Windows 8 optimized for both PC and tablet ...- Article authored by Kunal Chowdhury on .
 Inspired from Windows Phone 7 Metro UI look and feel, Microsoft included the same lock screen in Windows 8 optimized for both PC and tablet users. This is by default available in Windows 8 but if you want to disable it, there are no options provided by Microsoft in the settings page and hence you need to set some tricks to disable this lock screen if you are not happy using it every time.
Today, we will discuss about the process to disable this Windows 8 lock screen as well as we will show you how to re-enable it if the option is already disabled. So, continue reading.
The Windows 8 lock screen has two components: one is the background image and the other one is the badge that shows you the system date and time, mail, network and battery status. When locked, user needs to slide it before providing the password to unlock the device.
You can easily change these from the settings page but if you want to disable the screen, there are no direct settings available in the UI. To do this, you must have administrative rights to change out some policy settings.
Let’s jump into the process to disable the Windows 8 lock screen. If your system lock screen is already disabled, you can follow the same steps to re-enable the screen. Make sure that, you have administrative rights before proceeding further. This process needs a small settings change in the system’s policy file which you can modify using the Group Policy Editor (“gpedit.msc”) that comes with Windows.
Warning: Modifying system registry and/or system policies without proper knowledge can make your system unstable. Before working with these files, make sure that you have knowledge on these settings and will follow the exact steps mentioned here. I will not be responsible for any issues that you face after working with these files. So, try this on your own risk.
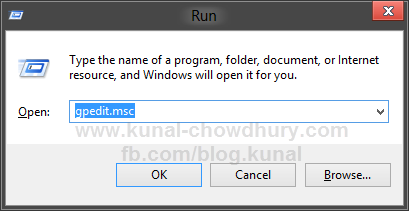
Open the run dialog by pressing Win + R from the Start Screen or desktop. Once the run dialog opens up in the screen, type “gpedit.msc” (without the quote) and press enter to launch the Group Policy Editor. Here is a screenshot of the same:

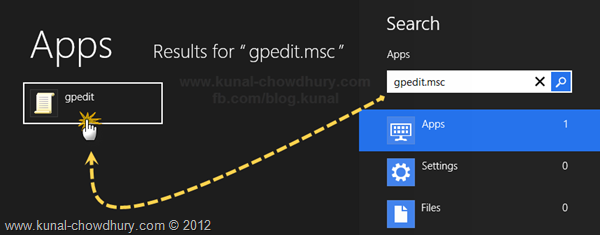
Alternatively, if you are in the Windows 8 Start Screen, you can search the file by directly typing in the start screen. “gpedit.msc” will show you the policy editor icon as shown below. Click the icon or press enter to launch the Group Policy Editor.

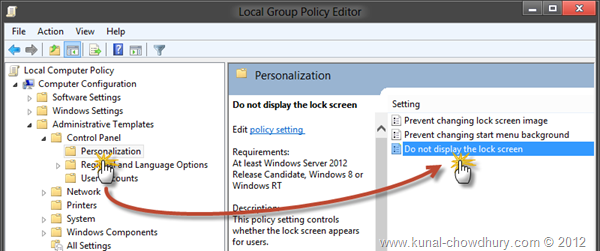
The group policy editor will look like this screen added below. Expand the “Computer Configuration” under the “Local Computer Policy”, then navigate to “Administrative Templates” –> “Control Panel” –> “Personalization” as shown in the below screenshot:

As you can see in the above screenshot, look out for the setting titled “Do not display the lock screen” in the right panel. Double click it to open the said configuration settings window. The window will look as shown below:

This policy setting controls whether the lock screen will appear for the users. If you enable this policy setting, users that are not required to press Ctrl + Alt + Del before signing in will see their selected tile after locking their PC. If you disable or do not configure the policy setting, users that are not required to press Ctrl + Alt + Del before signing in will see a lock screen after locking their PC. They must dismiss the lock screen using touch, keyboard or by dragging it with the mouse.
In the above said window, you will see three radio buttons named “Not Configured”, “Enabled” and “Disabled”. By default “Not Configured” will be selected. If you want to disabled the lock screen, chose “Enabled” from the above radio button group and if you want to re-enable it, chose “Disabled” or “Not Configured” from the above radio group.
Note: Don’t be confused on the settings mentioned above. Read the title of the setting properly. It says “Do not display lock screen” and hence if you select “Enable”, it will disable the lock screen and viz. Click “OK” to save the settings. Next time, you will (not) see the lock screen based on the settings that you opt for.
I hope that this small tip was helpful for you to understand the trick to enable/disable the Windows 8 lock screen. While playing with these settings take extra care to keep your PC stable. Again, I will not be responsible for any further issues that you consequence while working with this.
Last but not least, connect with me on Twitter and Facebook for technical updates and articles news. Also subscribe to my blog’s Newsletter to get all the updates delivered directly to your inbox. We won’t spam or share your email address as we respect your privacy.
Thank you for visiting our website!
We value your engagement and would love to hear your thoughts. Don't forget to leave a comment below to share your feedback, opinions, or questions.
We believe in fostering an interactive and inclusive community, and your comments play a crucial role in creating that environment.