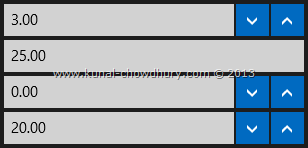
Numeric control is not new and all of us already experienced it in various applications and websites. Telerik also has this control in all of their control libraries but was missing in Windows 8 for XAML library. Recently they announced the beta release of 2013.Q2 for Windows 8.
In this post, we will start with this new control that’s first introduced with Q2 2013 release of Telerik’s RadControls for Windows 8 XAML and find out the common properties a developer needs.
Referenced Assemblies
Before starting with the code, you must have your Windows 8 Store Application Development Environment ready. Then create a blank Windows Store Project. Once you are done, add the following binary references in your project:
- Telerik.Core.dll
- Telerik.UI.Xaml.Input.dll
- Telerik.UI.Xaml.Primitives.dll
To start using the RadNumericBox for Windows 8 XAML, you must have the above DLLs from 2013.Q2 (Beta) or higher (version: 2013.2.529.45 or higher) added to your project.
Play with Code
First of all, you have to add the XMLNS namespace of Telerik Input library in your XAML page, so that, you can use the controls available under this namespace. RadNumericBox comes under “Telerik.UI.Xaml.Controls.Input” namespace. Here is the xmlns entry you should mention in your XAML page:
xmlns:telerik="using:Telerik.UI.Xaml.Controls.Input"
Once you are done with the xmlns namespace declaration, you will be able to insert the RadNumericBox control in your XAML page. Check out the additional properties that comes with this control. Set “ButtonsVisibility=Collapsed” to hide the up/down buttons from the UI. If you don’t want to set the NULL value to the control, set “AllowNullValue=False”. In case you want to change the numeric value by a delta (say: 10), specify that value under “SmallChange” property.
Here is the code snippet of various usage of properties of the Telerik RadNumericBox control:

Here is a demo screenshot of what we built just now. You can see that the first control is the default one, the second does not have the up/down buttons added to it, the third one will not allow you to enter any NULL value and default will be zero always. The forth one will have increment/decrement delta value of 10.

I hope that the post will give you a glance to the new control introduced with the Telerik RadControls for Windows 8 XAML (2013.Q2.Beta) and you will be able to use it in your Windows 8 Store applications with basic functionalities.
Connect with me one Twitter, Facebook and Google+ for technical discussions and updates. Don’t forget to subscribe to my blog’s RSS feed and Email Newsletter to get the regular updates directly delivered to your inbox. Happy Coding.


